
TOPS Green Thumbs - Radishes (part 3)

To read about the very beginnings of our 'radishes' please go to PART 1 and then PART 2.


DAY 8 - Monday

The only thing we were supposed to do on that day was to go back to the notes from last week and draw a SPROUT GRAPH. Our graph turned out a bit different from the one expected by the authors of the book - our seeds have sprouted much faster and much better (thank you Taiwan for warm and humid weather!).


DAY 9 - TUESDAY

It's time to reuse the box that was used for observation of seeds and sprouts during last week. This time we have to make a hole in the middle of the bottom side and cut off the lid. Then we need to place a paper towel through the hole and set the whole box on top of a jar with water (in a way that the paper towel will be submerged in water).

Paper towel pushed through a hole
on the bottom of the box.

The box with paper towel
is placed on top of a jar with water.

Inside the box we placed another piece of paper towel,
with circles labeled as above, plus 4 new radish seeds.

Everything needed to be watered
and the box covered with plastic foil.


DAY 10 - Wednesday

Today we finished two of the earier experiments - "Four Environments" and "Day and Night".
We moved all the sprouts used in these experiments to our newly prepared greenhouse-box.

The sprouts from the dark (top) and light (left and bottom) jars.


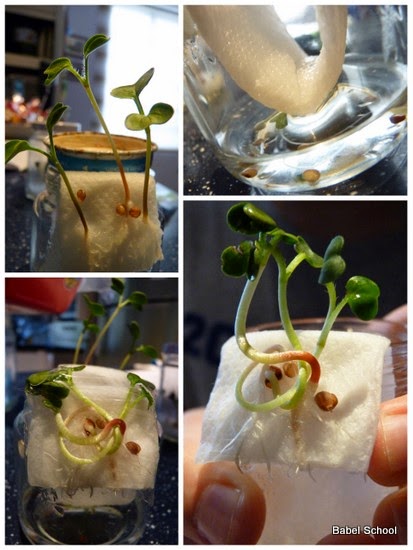
Sprouts from Four Environments experiment -
- cool+wet (top left), very wet (top right),
warm+wet (bottom), dry (not shown,
because there was no change to the seeds).
Sprouts were moved to the labeled circles in the greenhouse-box:


And now we have to wait to see what happens, which sprouts will grow the fastest and strongest.

To continue reading about our radishes, please go to part 4.

Comments

Popular posts from this blog

Animals Classification Lapbook

Last week Jaś has been very busy working on the animal classification lapbook. Lately it's been very difficult to get him interested in doing any kind of project, but to my surprise he has finished this lapbook in just a few days! I am really proud of him. I used a ready lapbook template from the wonderful Homeschool Share website, but I asked Jaś to writ all the information in his own handwriting instead of just printing the prepared text. Here are the photos of his lapbook: Jaś adding the finishing touches to the lapbook cover: Lapbook cover: The inside of the lapbook: Inside 'Classifying Living Things ': Animals with and without backbones are called:  Inside 'What are the four main Invertebrate Classes?': Inside 'What are the five Vertebrate Classes?': Mollusk characteristics Annelid characteristics: Arthropod characteristics: Echinoderm characteristics: Fish characteristics: Reptile char...

Fryderyk Chopin - lapbook

Po powrocie na Tajwan zabrałyśmy się ostro za naukę. Pierwszym projektem, który Ania zrobiła był lapbook o Chopinie. Przygotowując się do wykonania lapbooka, Ania wysłuchała wielu utworów Chopina, a także przeczytała (lub wysłuchała) poniższych opowiadań i książek o tym wielkim kompozytorze. Znalazłam też kilka pocztówek kupionych przy okazji wizyt w Żelazowej Woli i w Muzeum Chopina w Warszawie. W końcu do czegoś się te pocztówki przydały. Niektóre części do lapbooka znalazłam na stronie Teachers Pay Teachers u Hord Arsalan ( TUTAJ ). Strona tytułowa: Lista niektórych wysłuchanych utworów Chopina: Rodzina Fryderyka Chopina: Z tyłu lapbooka znajduje się oś czasu z najważniejszymi datami z życia Chopina: Jak widać, jak zawsze mieszamy języki, głównie polski i angielski. Ani nie robi różnicy czy uczy się po polsku czy po angielsku, tak więc jej notatki i projekty są również dwujęzyczne.

Pszczółka z rolki

Coraz rzadziej piszę tu o tym co robimy w domu, a coraz częściej o naszych wycieczkach i odkrywaniu przyrody. Dzisiaj jednak pokażę Wam co takiego kilka dni temu zrobiła Ania. Kilka tygodni temu dotarła do nas w końcu książka Piotra Sochy pt. "Pszczoły". Od razu zabrałyśmy się do czytania. Jest to ślicznie wydana przez Wydawnictwo Dwie Siostry książka-album o wszystkim co związane jest w pszczołami. Lektura tej książki to dopiero początek naszego poznawania pszczół.  Oto pierwsza praca Ani związana z pszczołami: Potrzebne materiały: rolka po papierze toaletowym żółty papier czarny papier zielony papier błękitny papier lub przezroczysta kalka kwiatki - naklejki przyklejane oczy nożyczki klej czarny flamaster Przycinamy kawałek żółtego papieru i oklejamy nim rolkę: Przycinamy trzy paski czarnego papieru o przyklejamy je jako paski pszczółki: Teraz kolej na skrzydełka i czułki: Przyklejamy lub rysujemy oczy i buzię-uśmiech: ...